• Skip to primary navigation
  • Skip to main content
  • Skip to primary sidebar
  • Skip to footer
Simple Green Recipes
  • Home
  • RECIPES BY CATEGORY
    • Breakfast
    • Breads
    • Brownies & Bars
    • Cakes
    • Chocolate Desserts
    • Cookies
    • Donuts
    • Glass Desserts
    • Ice Cream & Frozen Treat
    • Muffins & Cupcakes
    • Pies & Tarts
    • Savory
    • Holiday Recipes
    • Vegan Basics
  • RECIPES BY DIET
    • Vegan
    • Vegetarian
    • Gluten-free
    • Grain-free
  • CONTACT
    • Content & Privacy Policy
    • Cookie Policy
    • Nutrition Disclaimer
  • ABOUT
  • Navigation Menu: Social Icons

    • Facebook
    • Instagram
    • Pinterest
    • Twitter
menu icon
go to homepage
subscribe
search icon
Homepage link
  • Recipes By Category
  • Recipes By Diet
  • About
  • Contact
    • Email
    • Facebook
    • Instagram
    • Pinterest
    • Twitter
  • ×

    Home » Photography » 9-Step Lightroom Editing Workflow for Food Photography_part 2

    9-Step Lightroom Editing Workflow for Food Photography_part 2

    Published: May 22, 2019 · Modified: Jan 5, 2023 by Natalia · This post may contain affiliate links .

    194 shares
    • Share
    • Yummly
    • Twitter

    9-Step Lightroom Editing Workflow for Food Photography

    When I started taking photos of my food creations, some years ago, I thought taking great pics would be easier. But as you may have also seen, it’s a lot harder than it looks! Often, you get almost everything right: the food, the composition and the styling, but your camera doesn’t seem to capture the scene the way your eyes do.

    However, as digital photographers, and with the right Lightroom Editing Workflow, we can put our final touches on an image and really make our food pop. And, like with everything you’re trying to master, practice makes perfect.

    To help you with your image editing, I’m sharing the second part of My 9-Step Lightroom Editing Workflow for Food Photography  in this post . You can find Part 1 here.

    9-Step Lightroom Editing Workflow for Food Photography

    9-Step Lightroom Editing Workflow for Food Photography (Part 2)

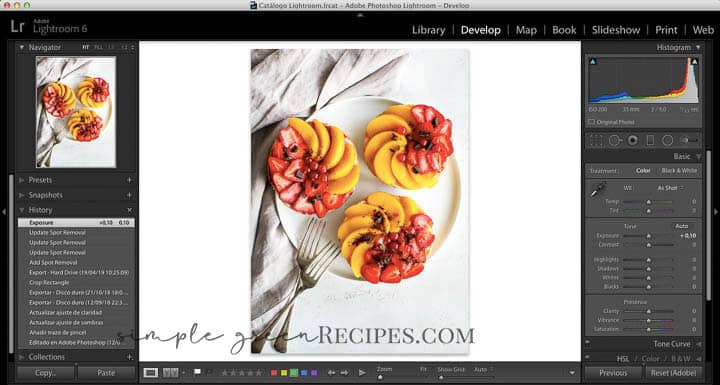
    I normally work from top to bottom, starting at the topmost panel of the Develop Mode and working my way down. So, once I have gone through the Presence section (Part 1), I go to the Detail panel. But before that, I clean the image and fix the small imperfections with the Spot Removal tool.

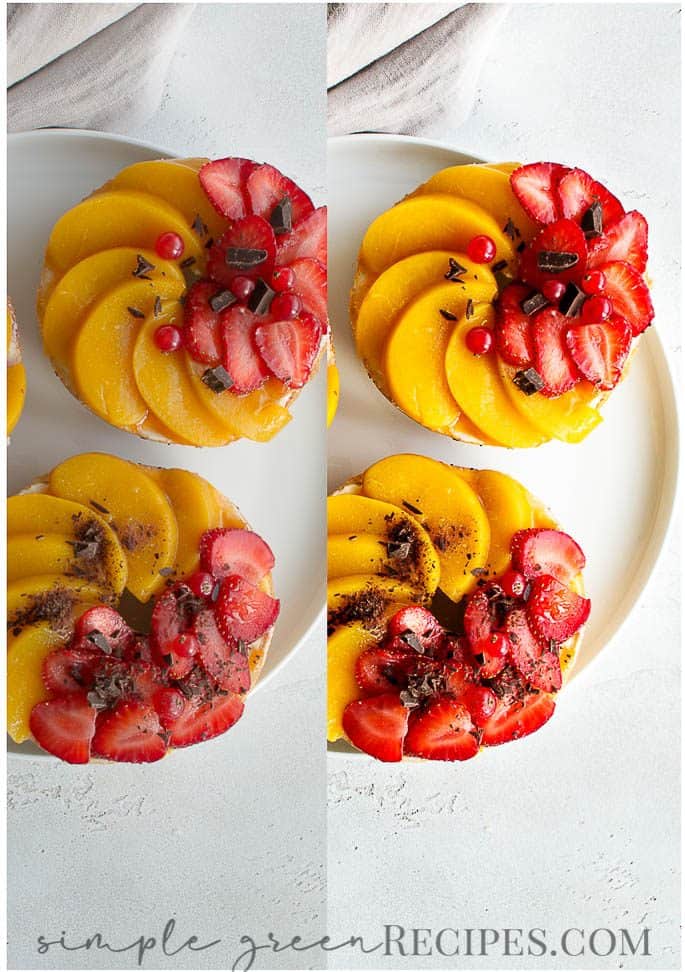
    Step 5: Spot Removal

    If you have small spots in your image, such as crumbs, you can remove them using the Spot Removal tool at the top of the Develop top panel.

    Select either Heal that matches the texture, lighting, and shading of the sampled area to the selected area, or Clone, which duplicates the sampled area of the image to the selected area.

    The size of the brush must be a little larger than the area you are trying to cover. To specify the size, move the slider to the right or to the left to adjust the brush size. Place the cursor on top of the area you want to fix and click, Lightroom will do its best to find a similar piece from your photo to replace that spot .

    Step 6: Detail settings

    Sharpening: Normally Lightroom will apply default sharpening on your photo, so you have something to start working with. Move the “amount” slider, which is the basic sharpening control, to the right to sharpen a bit more your image. Don’t over-sharpen or your image look too “textured”. Usually about 50% is a good optimal position for Amount but it will vary for each picture.

    Step 7: Lens correction

    Certain lenses can cause distortion or vignetting in your images. Lightroom is already filled with different lens profiles corrections for most of the lens. Just click “enable profile corrections” in the “Profile” section of the Lens Correction module and Lightroom applies custom profile corrections to fix the distortion for the lens you used.

    Step 8: Effects

    I use the Effects panel for adding “vignettes” to some of my images, so that I can draw the viewer’s eye to the subject of the photo. To do so, I pull the “amount” slider towards the left to darken the corners and edges of an image. This creates a subtle vignette around the image.

    Step 9: Exporting your file

    When the photograph is ready to be published, I export the processed file. This takes place in the Library module. Once there, I go to File → Export in the menu to bring up the Export Dialogue box. There, I basically save the file as a full size, high-quality .jpeg. Later, in Photoshop, I resize it for the different purposes, be it the blog, Pinterest, Instagram and Facebook, and add my Watermark.

    More photography resources from Simple Green Recipes:

    9-Step Lightroom Editing Workflow for Food Photography (Part 1)

    9-Step Lightroom Editing Workflow for Food Photography to Level up your food images.

    Natalia's Signature
    « Easy Vegan Gluten-Free Waffles
    Vegan Gluten-Free Blueberry Glazed Donuts »

    Reader Interactions

    Leave a Comment Cancel reply

    Your email address will not be published. Required fields are marked *

    Recipe Rating


    Primary Sidebar

    About Natalia from Simple Green Recipes

    Hello and welcome to my blog! I’m so excited to have you here! I’m Natalia and I’m a recipe developer and food photographer with a passion for healthy, delicious and pretty food.

    Read More…

    Don’t Miss a Recipe!

    Get the latest posts weekly on your inbox!

    Content & Privacy Policy

    COOKIE RECIPES

    Stack of cookies next to a halved lemon, placed on a parchment paper over a cooling rack.

    Vegan Lemon Cookies

    Stack of cookies with sprinkles on a parchment paper over a cooling rack

    Vegan Funfetti Cookies

    split vegan oatmeal cookie on a white board, surrounded by more cookies

    Vegan Oatmeal Raisin Cookies

    three chocolate chip cookies on a parchment paper

    Vegan Gluten Free Chocolate Chip Cookies

    stack of peanut butter cookies with chocolate chips, on a white wooden cutting board

    Vegan Peanut Butter Chocolate Chip Cookies

    Over head shot of the cookies iced and decorated with sugar pearls, placed on a wooden white surface.

    Vegan Sugar Cookies

    Categories

    HOLIDAY RECIPES

    Closeup of the cookies a cardboard box and parchment paper.

    Vegan Linzer Cookies

    Over head shot of the gingerbread man cookies on a white surface.

    Vegan Gingerbread Cookies

    Sliced carrot cake on a white plate and two slices on two smaller white plates.

    Vegan Gluten-Free Carrot Cake

    Best Chocolate Cake Recipe

    Easy Vegan Chocolate Cake

    Easy Vegan Pecan Pie

    Vegan Pecan Pie

    Homemade Vegan Glutenfree Pumpkin Pie

    Vegan Gluten-free Pumpkin Pie

    Footer

    Subscribe

    for your weekly updates.

    Content & Privacy Policy

    STAY IN TOUCH

    • Email
    • Facebook
    • Instagram
    • Pinterest
    • Twitter

    Hello and welcome to my blog! I’m Natalia and I'm a recipe developer and food photographer with a passion for healthy, delicious food. Read More…


    AS SEEN IN

    Foodgawker logo

    My Favorites

    sliced apple galette on a white surface, halved apples, bowl with ice cream and ice cream scoop.
    Stack of cookies next to a halved lemon, placed on a parchment paper over a cooling rack.
    Chocolate cupcake frosted with chocolate frosting and placed in a muffin pan.

    Copyright © 2023 Simple Green Recipes

    Privacy Policy

    NUTRITION DISCLAIMER

    This website uses cookies to improve your experience. We'll assume you're ok with this, but you can opt-out if you wish.AcceptReject Read More
    Privacy & Cookie Policy

    Privacy Overview

    This website uses cookies to improve your experience while you navigate through the website. Out of these, the cookies that are categorized as necessary are stored on your browser as they are essential for the working of basic functionalities of the website. We also use third-party cookies that help us analyze and understand how you use this website. These cookies will be stored in your browser only with your consent. You also have the option to opt-out of these cookies. But opting out of some of these cookies may affect your browsing experience.
    Necessary
    Always Enabled
    Necessary cookies are absolutely essential for the website to function properly. This category only includes cookies that ensures basic functionalities and security features of the website. These cookies do not store any personal information.
    Non-necessary
    Any cookies that may not be particularly necessary for the website to function and is used specifically to collect user personal data via analytics, ads, other embedded contents are termed as non-necessary cookies. It is mandatory to procure user consent prior to running these cookies on your website.
    SAVE & ACCEPT
    194 shares
    • Pinterest
    • Facebook
    • Yummly
    • Twitter